How to create Single/Open Charter
Events
- How to Edit Events
- How to Cancel an Event?
- What are Open Party Trips
- What are Reoccurring Events
- How to Block and Unblock Events
- What are Single/Open Events
- How to Delete an Event
- What are Open Charter Trips
- How to create a Charter Event?
- How to Convert a Vacant Open Party Event into a Charter Event?
- How to create a Custom Charter booking for your customer?
- How to create Charter Events from scratch?
- What are Custom Charters
- How to create a Standard Charter trip?
- How to create Reoccurring Charter Events
- What are Standard Charters
- How to create Single/Open Charter
How to create Single/Open Charter
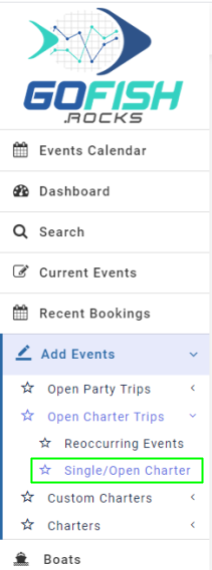
Step 1. Click on Single/Open Charter
Login to your system and click on Single/Open Charter under ‘Add Events’.

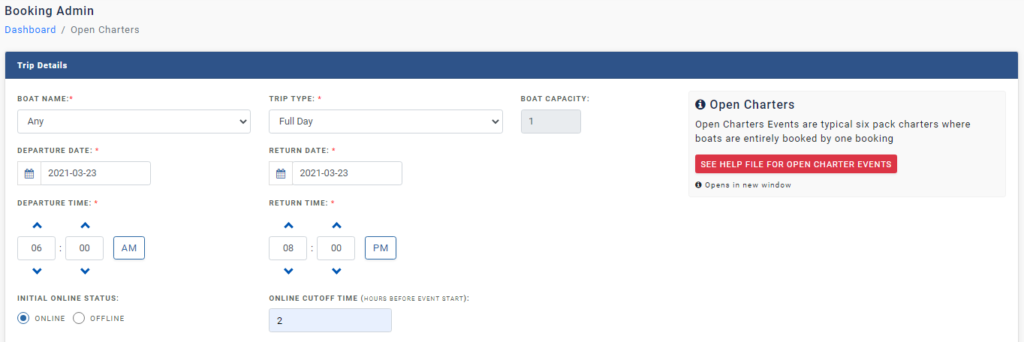
Step 2 - Fill in the following details
Trip Details – Trip details include the basic information related to your trip.
- Boat Name – Enter boat name
- Trip Type – Enter trip type
- Boat Capacity – Enter boat capacity
- Departure Date – Enter start date
- Return Date – Enter end date
- Departure Time – Enter start time
- Return time – Enter return time
- Initial Online Status – Offline trips are not available for public users to book directly. Only the admin can make a booking on offline events through the back end.
- Online cutoff time – This feature allows you to make your event go offline for more bookings right before your departure/ event start time.

Fee Details – Here you’ll see all the Fee details. Fill in all the details correctly
- Total amount – Enter total charter fee
- Deposit type – You can allow your customers to pay partially at the time of booking and the rest of the amount you can charge later. You can take it as a flat rate (in US Dollars or in percentage.

- Deposit amount – You’re required to enter the amount deposited by the customer here.
- Balance Amount – Enter the balance amount here.

Balance treatment – These options are for the treatment of the balance due upon the customer.
- At the time of departure – Select this if your customer wants to pay the balance at the time of departure.
- Prior to departure – Select this if your customer wants to pay the balance prior to departure. Enter the number of days prior to departure the customers want to pay the balance. Suppose a customer wants to pay the balance 3 days prior to departure. You can select the ‘Prior to departure’ option and type 3 in the box provided.

- Include payment link – If you choose this option; the system will send an email to the customer with the payment link in the email. The customer can process that payment from that link itself.
- Choose to call – With this option; the email will ask the customer to call you directly.
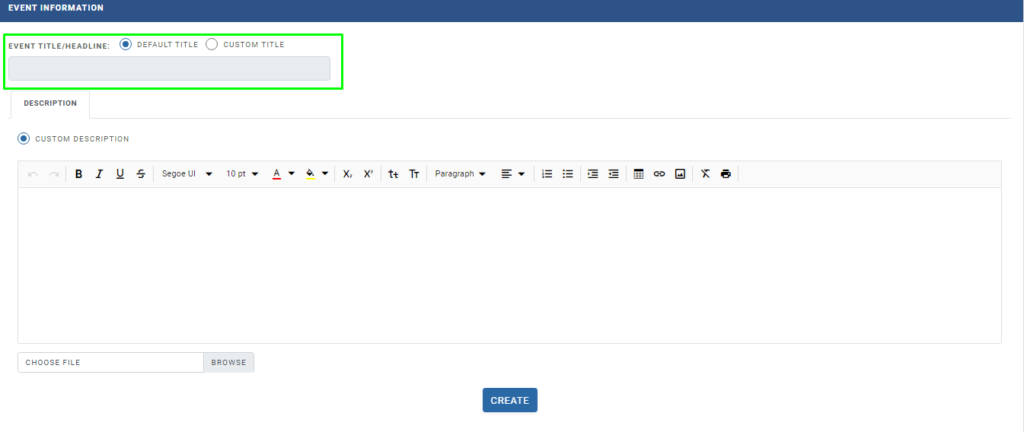
Event Information
Event Title/Headline Here you’re required to enter Event Title/Headline for your event. You can choose to select among the default titles or can create a custom of your choice.

Description
Enter a description of your event explaining all the necessary information for your customers.
Events
- How to Edit Events
- How to Cancel an Event?
- What are Open Party Trips
- What are Reoccurring Events
- How to Block and Unblock Events
- What are Single/Open Events
- How to Delete an Event
- What are Open Charter Trips
- How to create a Charter Event?
- How to Convert a Vacant Open Party Event into a Charter Event?
- How to create a Custom Charter booking for your customer?
- How to create Charter Events from scratch?
- What are Custom Charters
- How to create a Standard Charter trip?
- How to create Reoccurring Charter Events
- What are Standard Charters
- How to create Single/Open Charter

